Template Entities
There are many reasons why you may want to or need to create your own entities in Home Assistant. As mentioned in HA’s own documentation, “the template integration allows creating entities which derive their value from other data.” This is quite useful… as is the rest the content on that page! Here’s an example putting that into action (see the first code block).
Modern vs. Legacy Formatting
The two code samples below are presented to compare formatting changes between the current “modern” templating format and what is now considered “legacy” formatting.
The first block creates a sensor in HA called sensor.washing_machine and is in the legacy format (I created this in my HA instance a few years ago before there was a distinction between modern and legacy formatting). It creates a simple sensor that returns an on/off state based on whether its associated device has any current flowing through it. Note, this also could have been setup as a binary_sensor.
sensor:
  - platform: template
    sensors:
      washing_machine:
        value_template: >-
          {% set amps = states("sensor.sonoff_washing_machine_current") | float() %}
          {% if amps >0 %}
            on
          {% else %}
            off
          {% endif %}
Here’s the same sensor converted to the new Modern Format in Home Assistant.
template:
    - sensor:
    - name: "Washing Machine"
      unique_id: washing_machine
      state: >
      {% set amps = states("sensor.sonoff_washing_machine_current") | float() %}
      {% if amps >0 %}
          on
      {% else %}
          off
      {% endif %}
This code block creates the same sensor.washing_machine sensor in HA. NOTE: unique_id does not define the sensor name (though it looks like it in this example)! “name:” defines name. The underscore naming convention in this case has to be “understood.”
Example: Template Entity Creation and Usage
The code below creates two template sensor entities (sensor.max_outside_temperature_today & sensor.max_outside_temperature_this_week) to store the high temperature and the time it happened, for today and this week.
template:
  - trigger:
    - platform: time
      at: '00:00:00'
    - platform: state
      entity_id: sensor.outdoor_temperature
    sensor:
      - name: max outside temperature today
        unique_id: max_outside_temperature_today
        unit_of_measurement: "°F"
        device_class: temperature
        state: >
          {% set t_new = states('sensor.outdoor_temperature') | float(-1) %}
          {{ [t_new, this.state | float(-1)] | max if trigger.platform != 'time' else t_new }}
        attributes:
          last_updated: "{{ now() | as_local }}"


  - trigger:
    - platform: template
      value_template: "{{ today_at() - timedelta(days=(states('sensor.weekday_reindex') | int )) }}"
    - platform: template
      value_template: "{{ states('sensor.max_outside_temperature_today') | float(-99) > states('sensor.max_outside_temperature_this_week') | float(-99) }}"
    sensor:
      - name: max outside temperature this week
        unique_id: max_outside_temperature_this_week
        unit_of_measurement: "°F"
        device_class: temperature
        icon: mdi:thermometer-chevron-up
        state: "{{ states('sensor.max_outside_temperature_today') | float(-99) }}"
        attributes:
          last_updated: "{{ now() | as_local }}"
With the Mushroom template custom card these sensors can be displayed in the UI as:
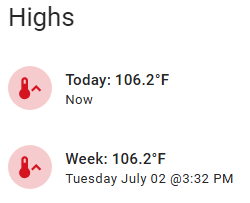
For the Week sensor, the template code to retrieve and format the datetime value on the second line is:
{{ as_timestamp(states.sensor.max_outside_temperature_this_week.attributes.last_updated) | timestamp_custom('%A %B %d @%-I:%M %p') }}