
Replacing my Rachio with a Custom Sprinkler Controller, Part II: Software
This is the second part to a two part blog series I started here about building a custom sprinkler controller. The first part focused on the hardware build, whereas this part covers the software that runs on the device and the Home Assistant dashboard I created to manage it.
Controller Setup
ESPhome
The relay board I chose to use for my new sprinkler controller came with an embedded ESP32 microcontroller and was in need of software that cold run on it. Arduino is a popular development framework choice for IoT devices like this, but I went with ESPHome instead, mostly because it integrates so well with Home Assistant. Another reason was that ESPhome had a predefined sprinkler component that I could use as a starting point to build from.
From there, I also added features like:
- Rain skip, using my local sensors
- Zone runtime adjustments based on outside temperature - also using my local sensors
- Zone scheduling per day instead of per cycle
- Ability to temporarily enable/disable specific zones
While Home Assistant does provide sensor data to the controller, the device itself, is otherwise configured to run independently. This means the controller would still able to perform its schedule even if Home Assistant or wifi were to become unavailable.
The full configuration file is available here.
A few notes about the config file:
- Zones can be scheduled per day, but each day has only one start time. My use case does not need multiple waterings per day.
- The config file is fairly lengthy (adding zone scheduling per day added many switches and complicated the scripting).
- I only use the start_from_queue action to execute a schedule. I am not using the run cycle concept as its been implemented in ESPhome’s sprinkler component.
Device Flashing
ESPHome compiles code from the config file and copies it to the device. Most updates can be done wirelessly, but the initial flash will need to be done with the board physically connected to a computer. Here’s an image of my board hooked-up to flash.
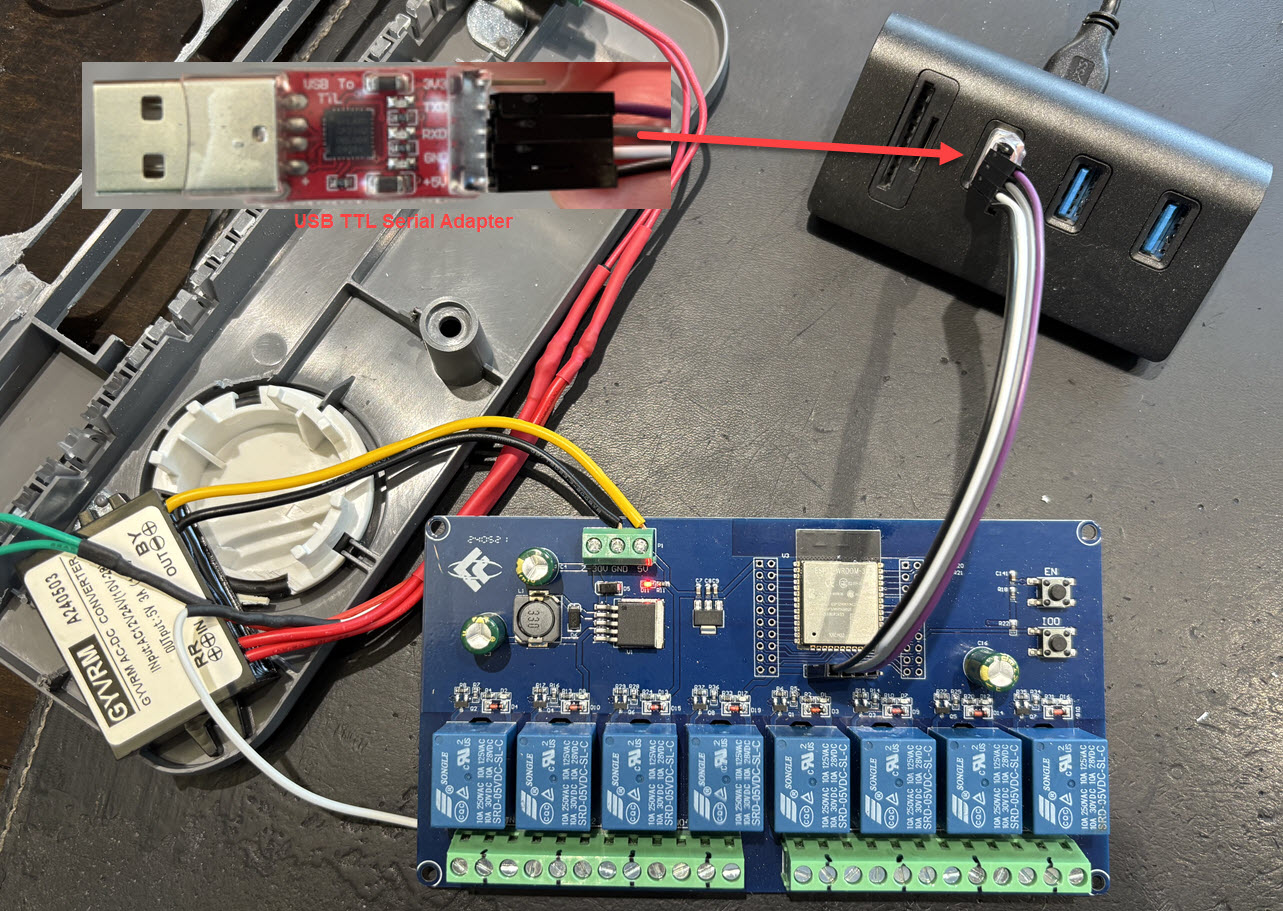
I know the image is not entirely clear, so here’s what’s going on:
-
I am using a USB TTL serial adapter plugged into my computer’s portable USB Port (picture insert with the arrow). The wiring to the serial adapter is as follows:
- Purple wire (it can be any color you choose) to TX
- Grey to RX
- White to GND
- Black to 5v*
* There are some notes online that 3.3v should be used instead. 5v worked for me, but if you have trouble try the lower voltage setting.
-
The other end of the wires are connected to a pin jumper (that comes with the board) so that when the jumper is inserted into the board’s burn interface (beneath the microcontroller) those wires are connected to the board’s UART interface:
- Purple to RX
- Grey to TX
- White to GND
- Black to 5v
NOTE: TX & RX stands for Transmit & Receive. You want TX on the serial adapter to go to the RX port on the controller and vice versa coming from the board to the serial adapter. Notice above how the purple & grey wires get switched.
Also, when flashing, the board needs to be plugged into an external power source. It is not evident in the picture that the board is plugged-in since the plug is off screen but you can verify that it is because the LED power indicator light is lit up (just below the yellow wire).
I found the step sequence listed in this post helpful the first time I flashed the board. I had to try it a couple times, and once the flashing started I think it took about 15-20 minutes to complete. The device will auto reboot when the flashing is complete.
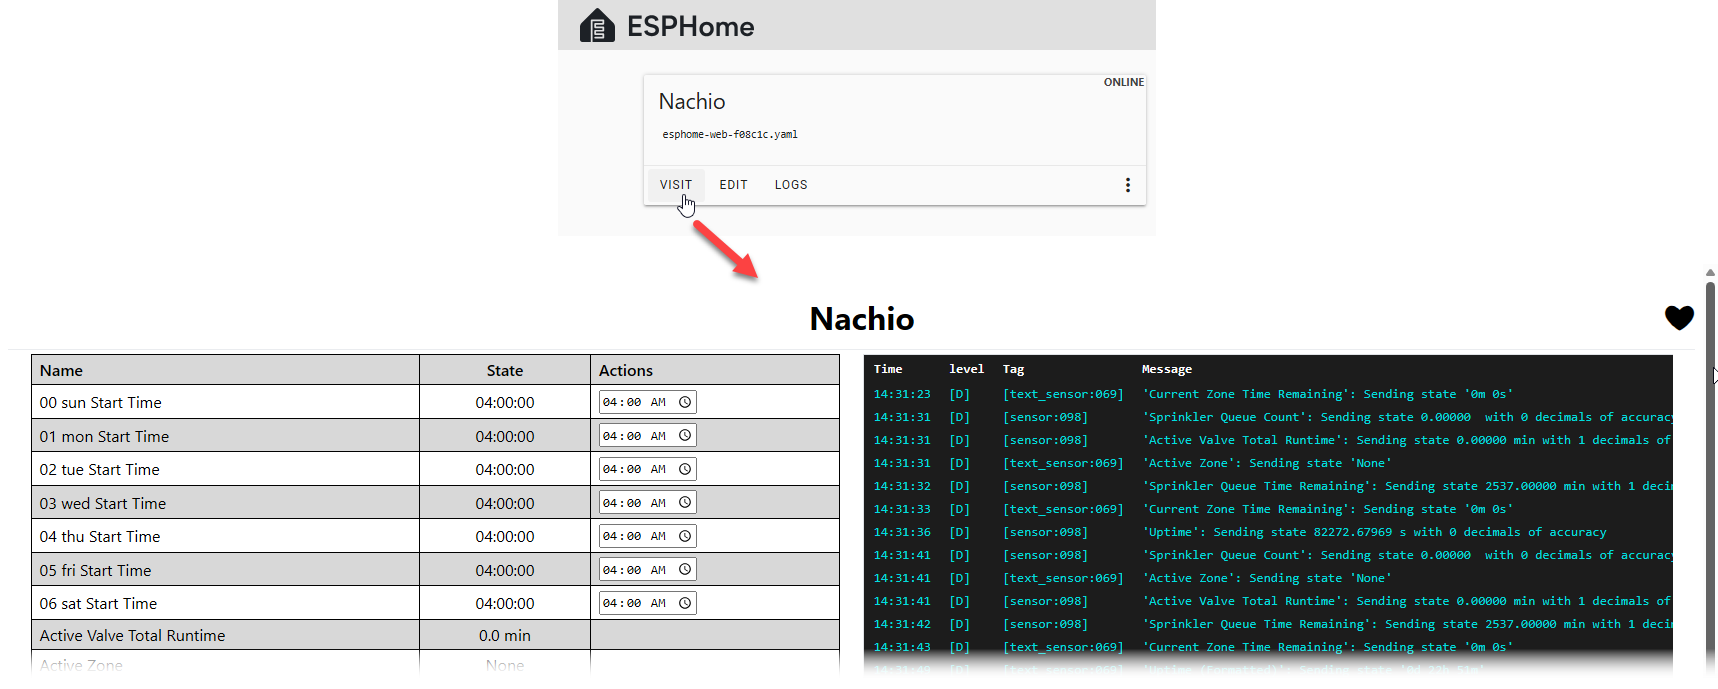
If you have enabled the web server in the config file, you can access the device’s UI by clicking Visit from the device’s listing in ESPHome’s main window.
Home Assistant
While the controller’s web server UI may be fine as a backup accessibility page, Home Assistant is the main environment where the controller will be monitored and managed from an everyday perspective.
To get there, these final few steps needed to be performed.
- The controller and Home Assistant needed to be connected so they could share data. Home Assistant should detect the device’s availability and ask you to add it, but in case it doesn’t, the ESPHome integration is the package you’ll want to install to get them talking. This will create the relevant controller entities and services in Home Assistant.
- I wanted Home Assistant to show specific zone information like Last Run and Last Runtime so I needed to create new entities in Home Assistant to capture that data. I used trigger based template sensors to create the entities. More information about these sensors types and the yaml I used is available here.
- Lastly, and probably the most time consuming, was a dashboard needed to be created to show details about the controller and to provide various controls to manage the device. This took me extra time since my dashboard is fairly dynamic and heavily customized. If it had been laid out simpler, it could have been done much faster.
Here’s the dashboard so far:
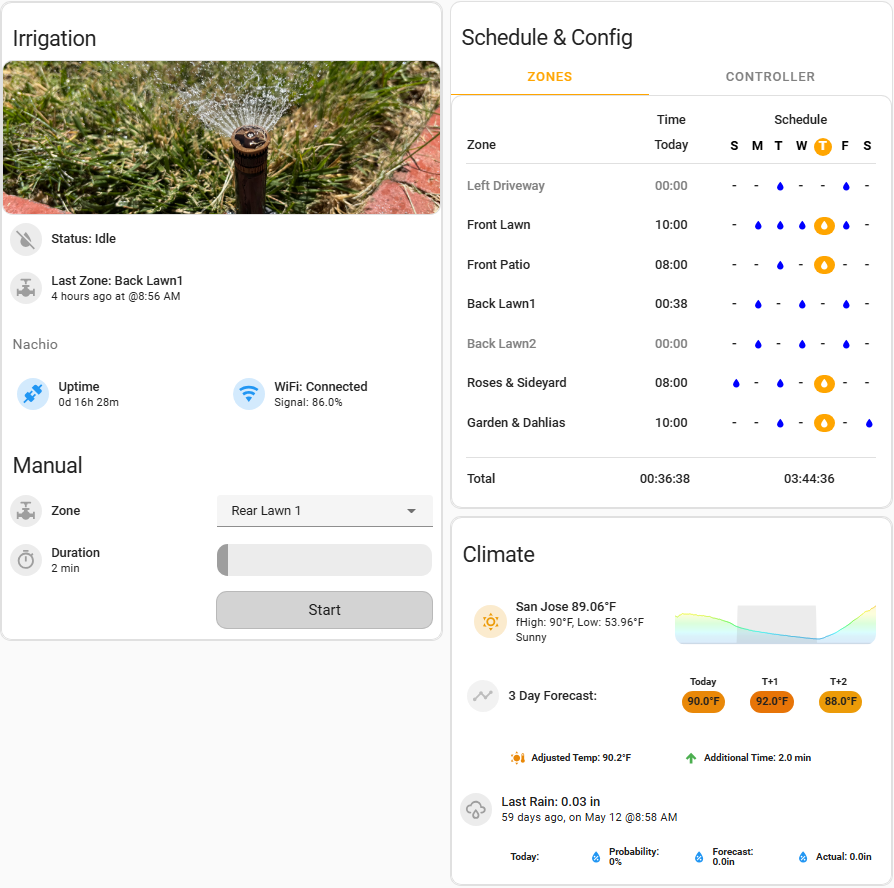
I’ll explain the function of each region below. All of the yaml used is available here.
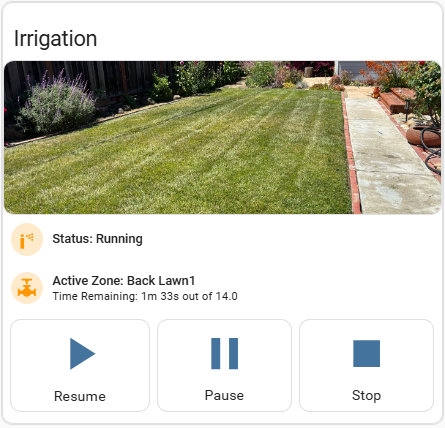
Irrigation
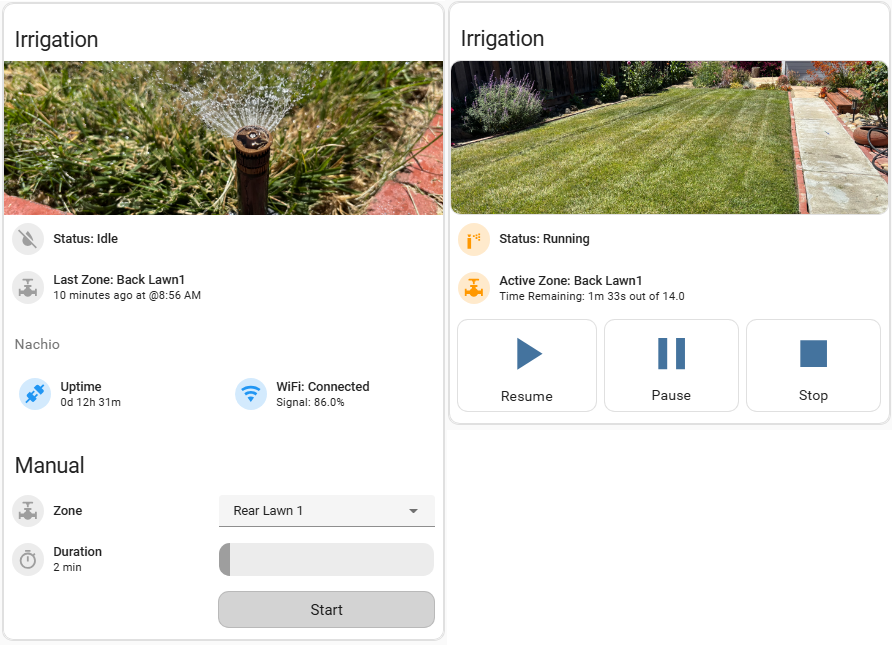
The purpose of this region is to inform the user about the state of the controller and to provide access to manually operate a valve.
The image on the left is the default screen when there is no zone activity, and the image on the right is the view when a zone is active.
Schedule & Config
In this section, I am using tabbed-cards and popup windows to provide access to additional information and controls.
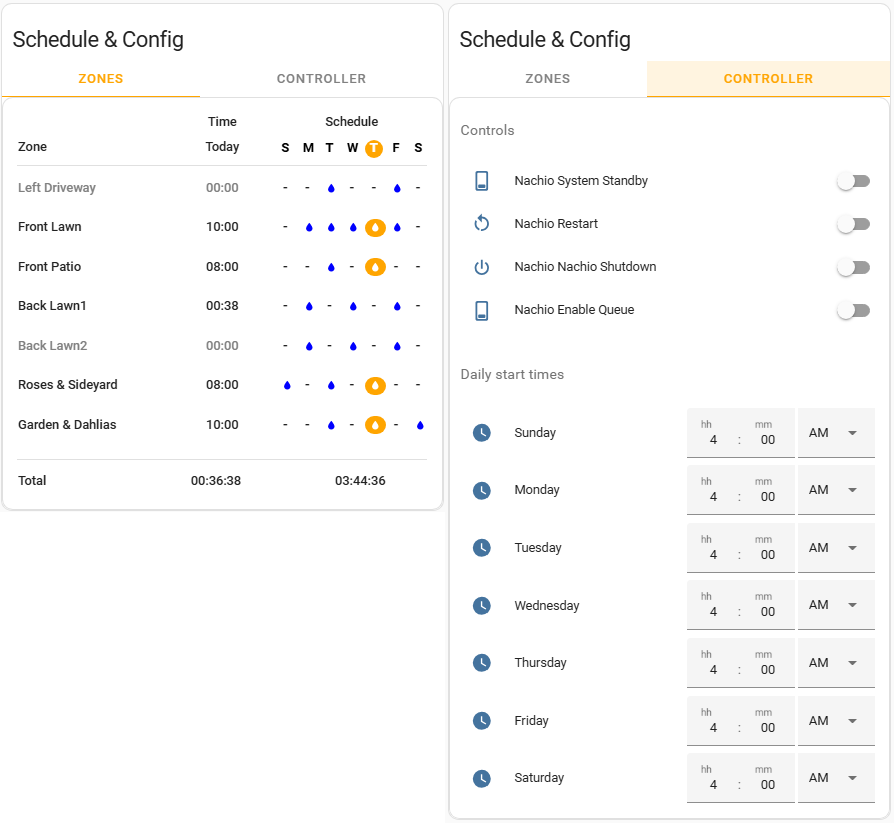
Here, the Schedule & Config card is divided into two tabs.
- The default tab, ZONES, lists each zone, indicates the day’s runtime per zone, and shows a weekly view of each zone’s watering schedule. Clicking a zone name will generate a popup window that gives more info about each zone (see Zone Detail in next section).
- The CONTROLLER tab provides access to additional controller level switches and inputs to specify the time of day the controller should check to see if any zones are scheduled to run.
Zone Detail
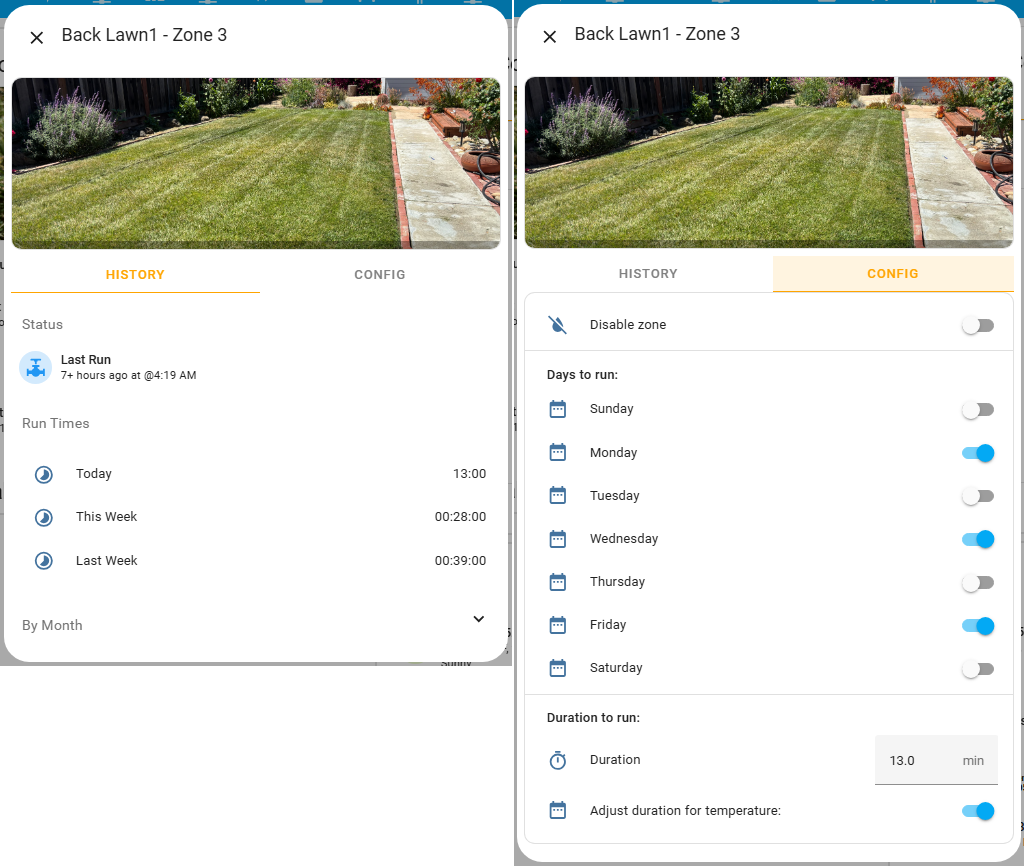
Zone detail is a popup window that is divided into two tabs. The window is activated when a zone name is clicked on the ZONES tab (see Schedule & Config above).
- The HISTORY tab is the default tab and largely gives info about when the zone was last run and a variety of information about time usage.
- The CONFIG tab provides access to various zone level settings:
- Disable the zone.
- Specify which days the zone should be run.
- Specify how long to run the zone when it is active and whether the duration should be temperature adjusted.
Weather Data
Since the controller has a rain skip feature and self adjusts runtimes based on the temperature, showing a weather section on this page helps to put those actions in context.
In the image below we can see that the next few days are forecasted to be in the low 90’s and the high 80’s. Based on those inputs, we see beneath the forecast that the controller is computing additional minutes to be added to the base zone runtime. The nice thing about this setup, is that even if that is not the correct adjustment for those temperature conditions, I can always tweak the calculation later as I make additional observations.
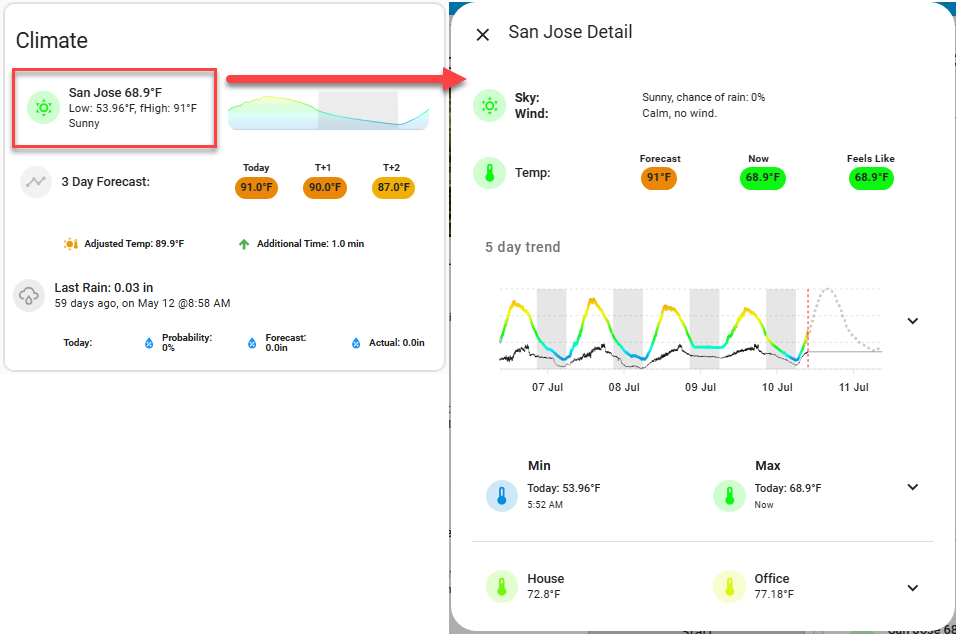
In an earlier blog post, I discussed my main weather dashboard in Home Assistant and detailed how the code has been modularized. A nice benefit of that arrangement is that I was able to leverage much of that pre-existing code for the weather view on this page. If you have already seen that post and some of this looked familiar, that is why. The picture above is illustrating that clicking in the outlined region will produce a popup window with more temperature detail.
Other Info
The screens above have the following plugin dependencies:
- Mushroom Cards - mostly the template and template chip cards.
- Decluttering Card - I started using this a long while ago, but it looks like it may no longer be maintained. Streamline-card seems to be the successor.
- lovelace-card-mod
- tabbed-card
Conclusion
This project was a lot of fun. This was my first time using ESPHome and I plan to again for other projects. In a way, I’m even a little glad my old Rachio controller failed when it did. Replacing it wasn’t on my todo list, but since I had to, I now feel like I have the functionality and Home Assistant usability that I could never quite achieve with the old device. Thanks Rachio!