
Automation ideas for Home Assistant

When I first started with Home Assistant I never expected to be eventually blogging about it. At the time, I just had a few automation use cases and I was looking for something I could run on my own hardware. That’s it. Of course, things are rarely that simple. I should have known. Once you have a few working automations, you begin to wonder what else is possible, and with Home Assistant, turns out that is quite a lot.
Getting started does take a bit of time. The technically savvy will of course go a little faster, but Home Assistant shouldn’t be beyond anyone willing to sit down and figure it out. I’m glad I was willing to give it a try. Searching config files on github helped, so did forums like Home Assistant and r/homeassistant on reddit. The official documentation and many many blogs like this post often provided guidance to a solution or just inspiration for something new. What follows then are examples from my own setup. To anyone looking how to do certain auotmations or just looking for ideas, hopefully this helps.
NOTES:
- To provide a little visual context, I thought it would be beneficial to start with a few dashboard examples. If you are here for the automations, by all means, jump ahead.
- A little detail on my environment might be helpful: I am running Home Assistant on a NAS box in Docker alongside PostgreSQL for the database, and Node-RED for automations. I subscribe to the Nabu Casa service to make the Samsung SmartThings, Alexa, and Mobile App integrations a little more seamless. A full breakdown can be found in my resources section.
- 2020-10-16 - Updated images & Node-RED example links
Dashboard Ideas
One of Home Assistant’s many strengths is the ability to view/control all of your smart devices in a single environment instead of across many individual apps. How much time you invest in building out dashboards is entirely a function of how you plan to interact with Home Assistant and what you want to get out of it. For some, robust dashboards culminating with strategically placed wall mounted displays around the home is considered the optimal smart home experience. While for others, optimal is the expectation that automations should do all the heavy lifting and UI’s simply fade into the background. There is no right or wrong here, just preference. For myself, I use dashboards mainly in a monitoring capacity but there are certainly times, when it is easier or quicker to control certain devices directly instead of using an automation or voice command.
If you are looking for ideas or just want to see what’s possible, here’s a few examples of the dashboards I have created.
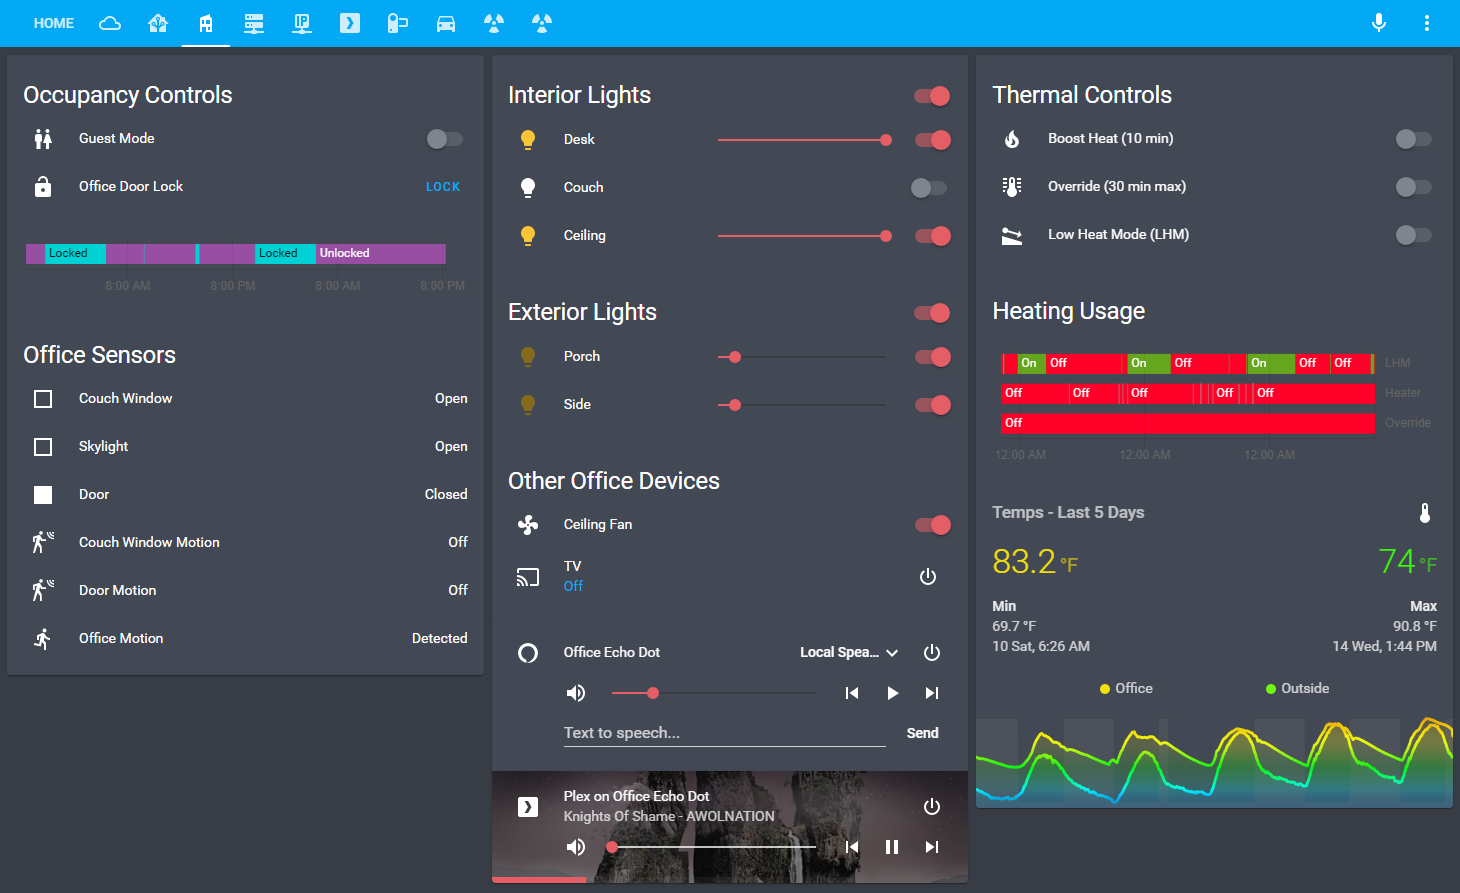
Home Office Controls
I have a home office separated from the house. This is the control page.
Weather\Climate Info
This is the page I’ve setup to monitor local weather and other environmental conditions. The tide information has been particularly handy when going to the beach …and I suppose an air quality graph could be useful if we keep having smokey skies in California :-\

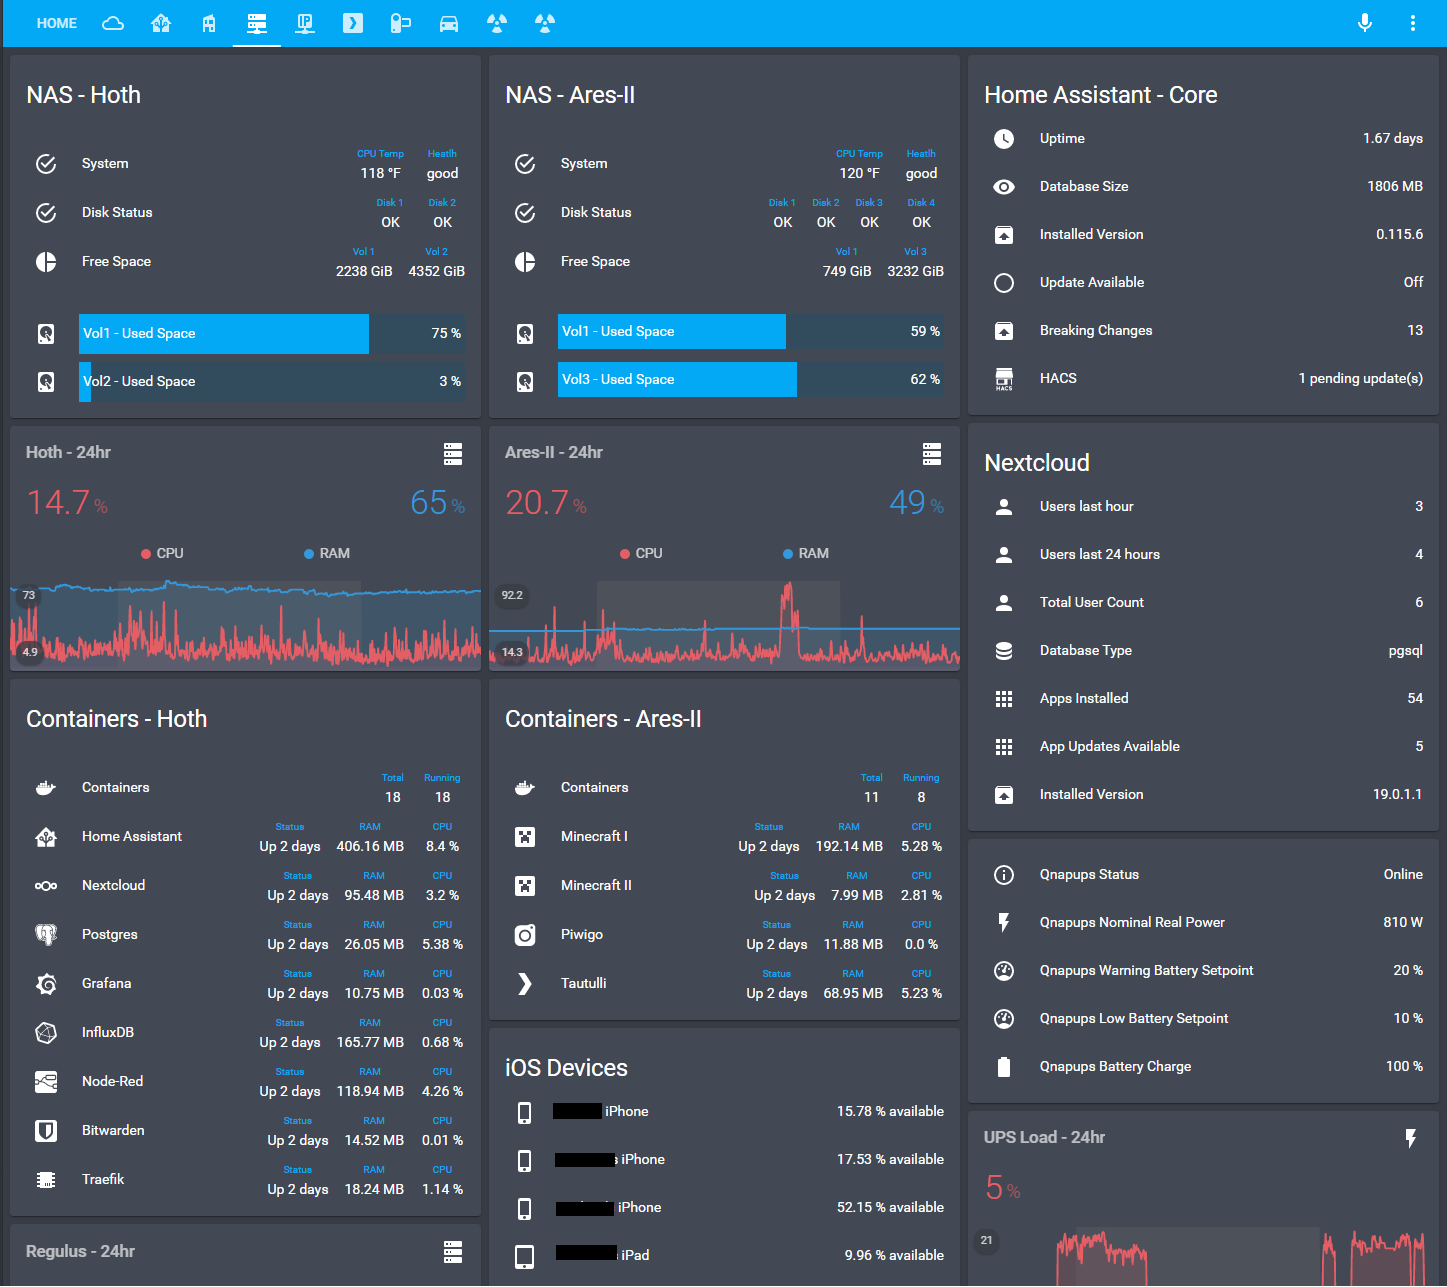
Systems Monitoring
This page gives a quick overview on the condition of the various devices I have around the house as well as a few of the containers I having running.
Additional dashboards show household activity, security camera info, traffic and travel conditions, even fitness activty data.
Here’s a list of the custom components I’ve used from the examples above:
Frontend:
- bar-card - Bar graphs
- History Graph Card - Shows device state history
- lovelace-layout-card - Controls card placement
- lovelace-multiple-entity-row - Allows multiple data points per row
- lovelace-slider-entity-row - Slider to increment a value, ex. light brightness percent
- mini-graph-card- Creates the graphs
- mini-media-player - Media player control
- vertical-stack-in-card - Allow multiple cards to be stacked together
- weather-card - Create animations for the weather card
- Webpage Card - Embeds other webpages/images/automations_for_has/graphs
Integrations:
- NOAA Tides - Tide Info
- USGS Earthquakes - Earthquake Info
- simpleicons - Retreives corporate icons
- Monitor Docker - Retrieves Docker container data
Automation Ideas
You’re here for the automations, so I’ll condense this intro down to “here’s a small collection of automation ideas I have found useful.”
NOTE: All of my examples are shown using Node-RED (a popular automation engine that runs alongside Home Assistant). Home Assistant’s own yaml based automation scripting has been much improved in recent months and many people have found less need to go to Node-RED. If this sounds like you, then these examples should exhibit a rough outline for a similar process to be defined in Home Assistant.
Starting simple - a basic light timer
Light timers are a pretty basic automation and have a broad range of applications. I use several around my home for different purposes. Here’s a simple example that controls the exterior lights to my home office.
Key Component:
- Smart switch, plug, or light - In this case, I am using TP-Link Smart Bulbs
Node-RED Sub-Flow:

__Process Explained:__
Yes, it doesn’t look like much but here’s what’s going on:
- I am using the Schedex Node in Node-RED. It accepts inputs for on/off times.
- GPS coordinates can be entered to calculate sun related events. I am using sunset time offset by 40 minutes for the daily turn-on event.
- Since the office is in my backyard, and because the wifi bulbs are dimmable, I also send a brightness percent value along with the turn-on command to insure my neighbors are not bothered by the light.
Control all lights in a room with a single switch
I have three sets of lights in my family room. The ceiling lights are connected to a wall switch while the media center lights and couch lamp are plugged into a wall outlet. They used to have to be turned on independently. Now, toggling the wall switch will similarly toggle each of the light sets plugged into the wall.
Key Components:
Smart switches, plugs, or lights. I am using:
Node-RED Sub-Flow:

__Process Explained:__
- In short, whenever the family room ceiling lights are toggled
on/off, the same action is taken on the media center & couch lights. - Note: I am using a time range node on each action because I only want the media center and couch lights to be turned on with the ceiling lights between the hours of 6am and 9:30PM. I want the lights to work independently outside those hours because I have a separate overnight automation to turn the ceiling lights on at 20% brightness when motion is detected.
Use motion detection to control a ceiling fan
Since ceiling fans are only useful when someone is present, why not use a motion sensor to control when a fan turns on or off? Throw in a temperature check to limit the on event to a certain temperature threshold.
Key Components:
- Motion Sensor - Many to choose from, I using an Ecolink Z-Wave Sensor
- Temperature Sensor - I am using a Samsung SmartThings Multipurpose Sensor
- Universal Wifi Wireless Remote - This includes a wifi enabled radio receiver that installs in your ceiling fan and replaces any existing radio only receiver
- Bond Web Service - Third-party service to control fans via the web. No fees.
- Bond Custom Component - Connects Home Assistant to the Bond Web Service
Node-RED Sub-Flow:

__Process Explained:__ - The fan turns on if motion is detected and the temperature is at least 82 degrees. - The fan will turn `off` if no motion is detected for 10 minutes \ \
### Control locks based on time of day and (or) presence In terms of everyday practicality, controlling door locks is easily one of my top five favorite automations. The example below controls the lock to my office. It's one less thing I have to worry about securing at night or whenever the house is left unoccupied.
Key Components:
- Smart Lock - Many options, I am using a Schlage Z-Wave Deadbolt
- iOS Mobile App - Used for notifications & presence detection
Node-RED Sub-Flow:
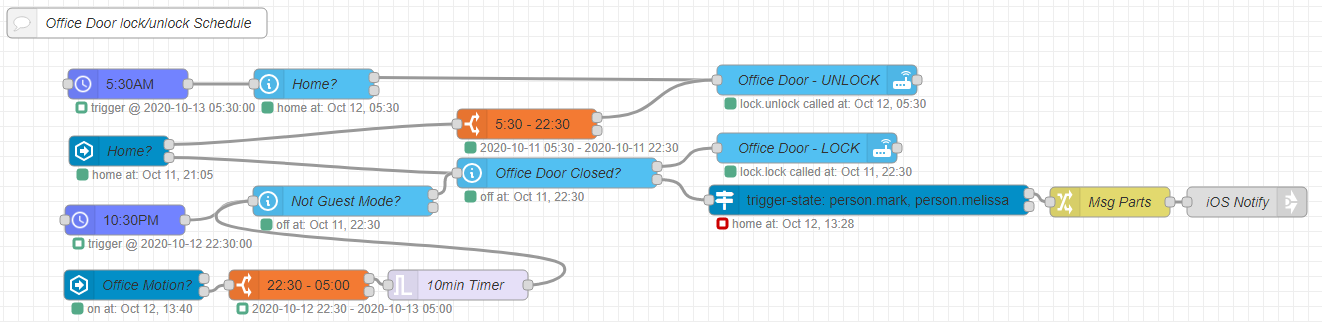
Process Explained:
- The door will unlock:
- At
5:30each morning if someone ishome - If
homebecomes occupied between5:30AM&10:30PM
- At
- If the door is
closed, it will lock:- At
10:30each night if the office is not inGuest Mode - Any time
homebecomes unoccupied 10 minutesafter last motion detection between the hours10:30PMand5:00AMif the office is not inGuest Mode
- At
- If the automation is triggered (close portion) and the door is not closed => send notification
Never forget to close the garage door
Someday I’ll update my garage door with equipement to auto close whenever we leave the house or if the door has been left open for more than 10 minutes after dark. Untill that day however, an alert notification goes a long way in mitigating the results of my sometimes forgetful mind.
Key Components:
- Tilt Sensor - Attached to garage door. I am using a Samsung SmartThings Multipurpose Sensor
- iOS Mobile App - Used for notifications & presence detection
- Alexa Media Player - Used to send TTS notifications to echo devices
Node-RED Sub-Flows:

Process Explained:
Pretty straight forward. Just attach a tilt sensor to your garage door then write the two conditions below:
- If you leave your house with the garage still open send alert to mobile device
- If you are at home after sunset and the garage door has been open for more than xx minutes, send alert (via smart speaker, mobile device, or both)
Daily task reminder and confirmation
There may be some tasks you need to do on a recurring basis that require so little effort (…like taking a pill) that the task is not only easy to forget but also hard to recall if it was done. Here is a process that can help with both:
Key Components:
- Input Boolean - Used as a flag to indicate whether the daily action was taken or not, value resets each night
- Remote Button - Used to control input boolean value, I am using a Samsung SmartThings Button
- iOS Mobile App - Used for notifications
- UI Control Element - Optional, alternative method to control input boolean if the button is not readily available
Node-RED Sub-Flows:
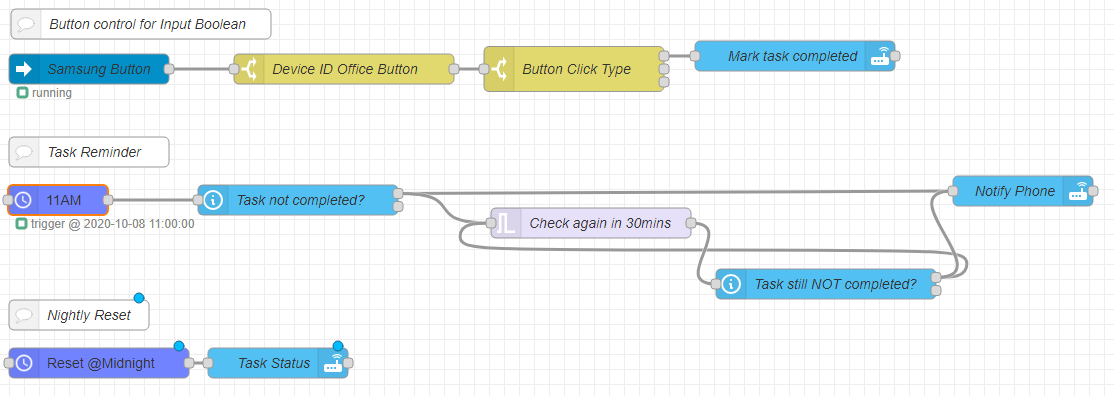
Process Explained:
- Place a smart button where the task takes place … in the case of taking a pill, it is kept with the pills.
- Press the button when the task is performed. This will mark the action as completed for the day
- Create a notification to be sent out at a certain time if the task is not marked completed by then. Loop every x minutes until the task has been performed.
Notes:
- If you expose a switch in the UI you can mark the task completed when you are away from home …or in cases where you performed the action but forgot to press the button.
- Obviously this is not fool proof. It can’t help with the case where you may have performed the task, forgot to press the button, then later after notification forgot whether you performed the task. …so yeah, your mileage may vary :-)
Track when it’s time to open(close) windows
Like many people, we like having our doors and windows open in the summertime to help cool the house in the evenings and mornings. Of course the challenge is that we are usually too occupied in the morning to notice when the outside becomes warmer than the inside and vice versa in the evening.
Conceptually at least, you would open & close up when the inside and outside temperatures cross as this graph illustrates.

Since I don’t know anyone actually willing to monitor temperatures that closely, why not create a process that does it for you?
Key Components:
- Inside Temperature Sensor - I am pulling this from my ecobee thermostat
- Outside Temperature Sensor - I am using the Darksky integration
- Input Booleans (2) - Used as flags to insure the open (close) notifications are only sent once per day, values reset nightly
- iOS Mobile App - Used for notifications & presence detection
- Alexa Media Player - Used to send TTS notifications to echo devices
Node-RED Sub-Flows:

Process Explained:
- This automation executes only if someone is home and the outside temperature is at least 72°F
- Inside and outside temperature values are then retrieved and compared. The comparison is evaluated using a function node (…that uses JavaScript) in Node-RED.
- During summer in California, outside temperatures generally rise in the morning and decrease in late afternoon. So in this case, temperature differences can be linked to time of day. If the outside temperature in the morning is greater than the inside temperature, it’s time to close up. Likewise in the afternoon, if the outside is less than the inside, time to open.
- If a notification has not been sent today, send notification to the person(s) at home and announce on Echo devices.
Send unload reminders when your washing machine is done
I’ve seen many variations on this one. For my household, the pratical value lies in the nag reminders once the cycle is complete. No one likes musty smelling cloths that have been left in the machine too long. Yes, gross. And at six years old, my washer is a little too old to have any useful “smart home” tech built-in. So here’s a process to “retro-fit” any standard washing machine.
Key Components:
- Smart Plug w/energy monitoring - Detects when the machine is drawing a current. I am using a Sonoff S31 Wifi Smart plug
- Contact Sensor - Detects when the door opens/closes. I am using a Samsung SmartThings Multipurpose Sensor
- Alexa Media Player - Used to send TTS notifications to echo devices
- iOS Mobile App - Used for notifications & presence detection
Prep-Work:
This automation I did a little different. While I could have placed all the logic in Node-RED, I wanted to separate the machine’s on/off state from its run cycle. This way, I could display the cycle end state in the UI and use it as a notification trigger to send reminders until the door has been opened. Here’s how those states are ultimately reported in Home Assistant (History):

This approach results in a more simple Node-RED flow downstream but it also forces the logic to move forward to properly control the states. This is done by creating new template based sensors in Home Assistant as per below:
- platform: template
  sensors:
    washing_machine:
      value_template: >-
        {% set amps = states("sensor.sonoff_washing_machine_current") | float %}
        {% if amps >0 %}
          On
        {% else %}
          Off
        {% endif %}
    washing_machine_cycle:
      value_template: >-
        {% set amps = states("sensor.sonoff_washing_machine_current") | float %}
        {% set time_now = as_timestamp(now()) | float %}
        {% set time_washing_machine_last_changed = as_timestamp(states.sensor.washing_machine.last_changed) | float %}
        {% set time_door_last_changed = as_timestamp(states.binary_sensor.washing_machine_door_sensor_contact.last_changed) | float %}
        {% set time_diff = time_now - time_washing_machine_last_changed %}

        {% if amps >0 and time_diff <345 %}
          Idle
        {% elif amps >0 and time_diff >=345 %}
          Running
        {% elif amps==0 and time_door_last_changed < time_washing_machine_last_changed and is_state("binary_sensor.washing_machine_door_sensor_contact", "off") %}
          Complete
        {% else %}
          Off
        {% endif %}
Sensor States Explained:
- Sensor:
washing_machine- isOffunless the Sonoff plug is drawing a current, then it isOn - Sensor:
washing_machine_cycle- isOffunless a condition below is satisfied, then it takes that condition stateIdle: plug is drawing current and washing_machine has been on for less than 335 seconds (washer auto shuts off after 5 1/2 mins of inactivity, added 5 sec buffer).Running: same as above, except if washer is still pulling a current after 335 seconds then it is engaged in some activity.Complete: The current is zero, the door is shut, and the door state has not changed since washing_machine last changed.
Node-RED Sub-Flow:
The simplified Node-RED flow only checks for the Complete event in washing_machine_cycle and attempts to send notifications.

Process Explained:
- Notifications will only be sent when these conditions are met:
- The washing machine cycle state is
Complete - The time of day is after
7:00am& before10:00pm - Someone is
home
- The washing machine cycle state is
- Notifications are sent to the iOS device of the person(s) home and an announcement is sent through Alexa to different Echo devices
Completely automate the control of a space heater
I actually wrote about this topic earlier this year. Since we’re heading into fall it may be relevant again. Hope on over to Smart Heating? if interested.
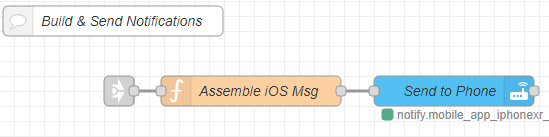
*Notification builder*
You may have noticed several flow examples ending with this node.  If you are not familiar, this is a Link node used to link to other subflows. In this case, I am linking to the subflow that builds most of my iOS notifications. This flow will be useful to complete the notification cycle if you are retreiving other code examples from my Node-RED repository on github.
Node-RED Sub-Flow:
### Related posts - [Energy monitoring in Home Assistant - with or without power meters](https://mwunderling.com/blog/energymonitoringha.html) - [*Alexa, turn the lights on*](https://mwunderling.com/blog/alexacontextaware.html)
Was this post helpful?
 or drop me a note in the comments. Thanks.