
Smart heating? (Updated 2020-12)

My first experience with home automation began out of necessity. A detached home office, recently completed, drove several use cases I was looking to automate and control remotely. Lights, locks, and heating were the obvious examples. So far, heating has proven to be my favorite automation. It solved a real problem (comfort) and offered a fair amount of complexity that made the automation setup fun. What follows is a breakdown of that setup for others that may have a similar need.
To get started, my heating objectives were:
- Keeping the space heated during the winter months with minimal intervention
- Heating the space economically and safely
- Accommodate different heating needs: occupied/unoccupied, home/not home
- Provide monitoring and usage data
- Provide manual (and remote) override controls (when needed)
Initially, I considered what I’d label traditional heating options, mostly various wall mounted solutions. But they either seemed too bulky, overpriced, and more importantly, none appeared to be able to satisfy all of my requirements particularly well, so I opted to build my own.
Here’s a quick component rundown that ultimately went into solution:
Hardware:
- Space Heater - Any electric heater with a manual on/off controls should work*
- Smart Plug - TP-Link HS100 Smart Wifi Plug**
- New (2020-12) - Replaced Smart plug with embedded Shelly 1PM switch
- Temperature Sensor - Samsung SmartThings Mulitpurpose Sensor
- Samsung SmartThings Hub (communicates via Zigbee with multipurpose sensor)
- Computing Device - Anything capable of running Home Assistant & Node-Red
* I used a $15 Holmes 1500 watt desktop heater in my 160sq ft space. Surprisingly, this worked much better than my bigger and pricer tower heater. Space heaters with a built-in thermostat will not work in this setup since the on/off function is controlled by the thermostat rather than an attached smart plug.
** WARNING POTENTIAL FIRE HAZARD: Your smart plug will have an Amp rating. Use a watts to amps converter to verify your plug can handle the watts usage of your heater. In my case, the TP-Link plug is rated to 15 Amps. The heater uses 1500 Watts which converts to 12.5 amps. Other things to consider can be found here: Running Space Heaters Safely
Software (Docker Containers):
Updated 2020-06-06: Dropped MQTT. Still use it in other places but not as part of my heating solution.
These services are most likely are already familiar to you if you are reading this post. If not, here’s the quick run-down: MQTTBridge enables any device connected to a Samsung Smartthings hub to pass data through to MQTT. MQTT, in turn passes data to Home Assistant. (I am now using the SmartThings Integration which allows the SmartThing hub to communicate directly to Home Assistant). Home Assistant acts as the UI and main integration service for virtually any IoT device. NodeRed (in my setup) receives device information from Home Assistant and performs all the automations.
TLDR : NodeRed is the brain. Home Assistant is the heart and the rest of central nervous system. MQTT services pass data.
*** *Note: before continuing, it's worth pointing out an easier and faster approach to manage temperature is to use Home Assistant's [Climate integration](https://www.home-assistant.io/integrations/climate/). I may make more use of it at a later day, but for now, I opted to go with the approach below as it gives me a little more granular controls.* ***
Ok, on to the good Stuff: Node-Red.
Given my requirements, I decided I needed to account for the following concepts in my Node Red flows:
- Home: is someone home or not?
- Office: is the office occupied or not?
- Time of day: what hours are the office likely to be occupied, not occupied?
- Time of day: were there other events that should be based on time?
- Guest Mode: a pull out sleeper is in the office, so yes, there may be overnight guests from time to time
- Motion: used to detect presence …or absence
- Temperature: should a minimum temp be maintained? … minimum level vs. comfort level?
- Temperature: thresholds for when to turn the heater on/off?
- Manual intervention
These concepts comprise my ruleset, and to keep things fairly simple I broke the set into two separate flows:
FLOW ONE:
I wanted to support a concept I ended up calling Low Heat Mode (LHM). This functions as an on/off switch and basically recognizes that I don’t always want to keep the space heated at the same temperature. There’s an implicit comfort heating level for when the space is in use, but otherwise the temp should be allowed to drop and maintain itself at a lower level until “comfort heat” is needed again. Elements influencing LHM activation include items 1-6 listed above (conceptually, this node addresses item 7).
Here’s the flow in Node-RED:
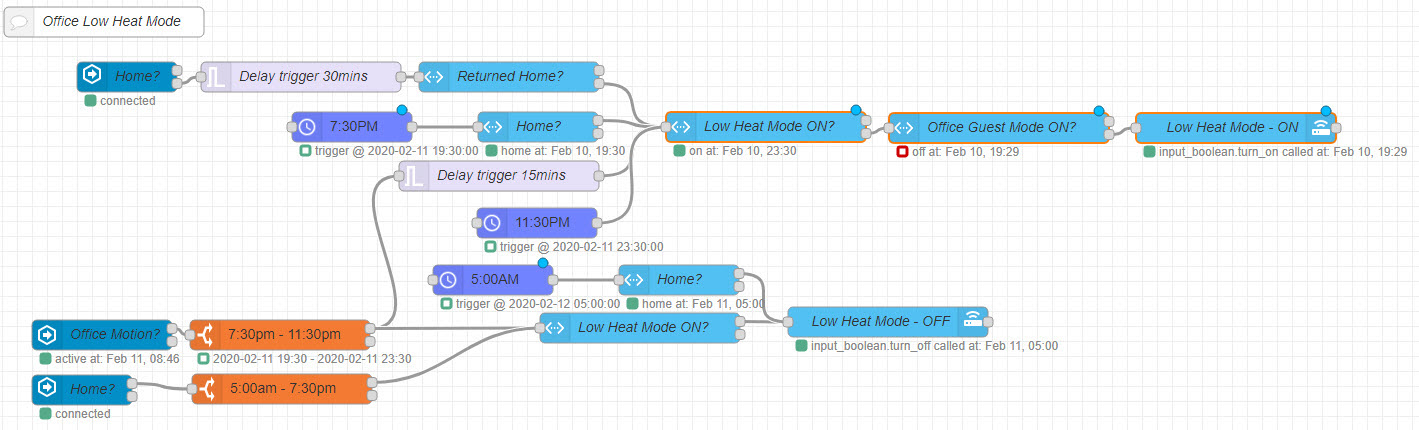
Comments:
- LHM will not turn on if Guest Mode is on
- LHM turns off at 5AM every morning if the house is occupied. This triggers the heater to come on and raise the temp to the higher tier (takes about an hour if raising fully from lower tier).
- LHM turns on 30 mins after the house sensor is set to Away
- LHM turns off if someone comes home any time between 5AM & 7:30PM. This time range is considered fair game for when the office may be used.
- LHM is controlled by motion detection between 7:30PM & 11:30PM
Flow Triggers:
- State change in Home
- State change in Motion
- Injection - Time of Day
FLOW TWO:
The second flow primarily decides between two heating tiers and whether the override is off/on (items 8 & 9 from above). LHM status (off/on) determines which heating tier (high/low) is in effect.
Here’s the flow in Node-RED:

Comment:
- Any override is limited to a max run time of 30 mins (safety precaution)
Flow Triggers:
- State change in Low Heat Mode
- Temperature change in sensor
Both flows are available in my github Node-RED repository.
Manual Controls and Usage Data in Home Assistant
Most of the time the flows above have worked great, but occasionally, having additional controls to “make it just a bit warmer” has proven useful. I decided keep things simple and use toggle controls instead of more fine grain controls like entering a discrete temperature number.
The image below is taken from my Home Assistant instance.
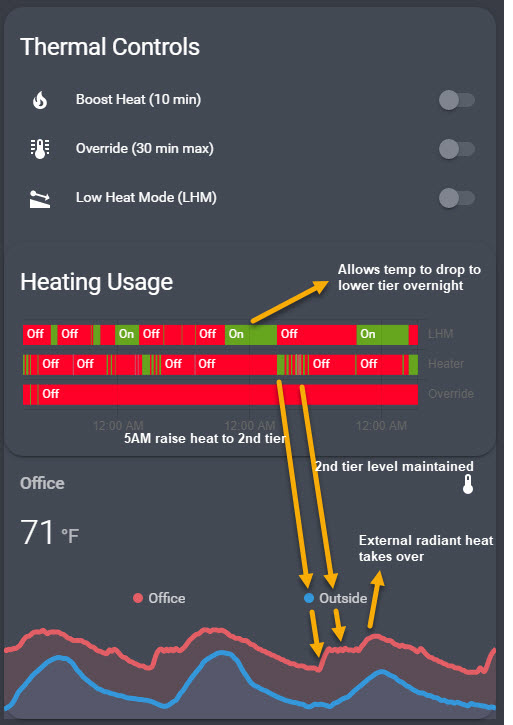
In the Thermal Controls section you can see I added the following:
- A timed 10 minute “Boost Heat” toggle
- A simple “Override” toggle (…limited to 30 minutes as mentioned).
Each has it’s own mini flow in Node-RED (Figure1, Figure2) to cycle through the larger nodes highlighted above.
Finally, to understand usage, I included two graphs under the manual controls.
- A bar graph (under Heating Usage) shows the last 72 hour state info for: LHM (on/off), Heater (on/off), and Override (on/off).
- A temperature graph shows the last 72 hour temperature trends for the office compared to the outside temperature.
The long green (“On”) blocks on the LHM bar grpah typically show the overnight length of time that Low Heat Mode was on. In the temperature graph you can see this time period correspond to a drop in the office’s temperature. When LHM turns off, the heater bar graph shows that the heater has turned on. The arrows point to the impact the heater “being on” has on the office temperature. NOTE: In this example the overnight tempertature in the office did not drop low enough to turn the heater on. If that had been the case, the graph would have shown a horizontal line showing the heater was maintaining the minimum temperature of 59 degrees. Instead, a continous downward slope is shown because the 59 degree minimum threshold was never reached. In other words, the overnight outside low was never cold enough.
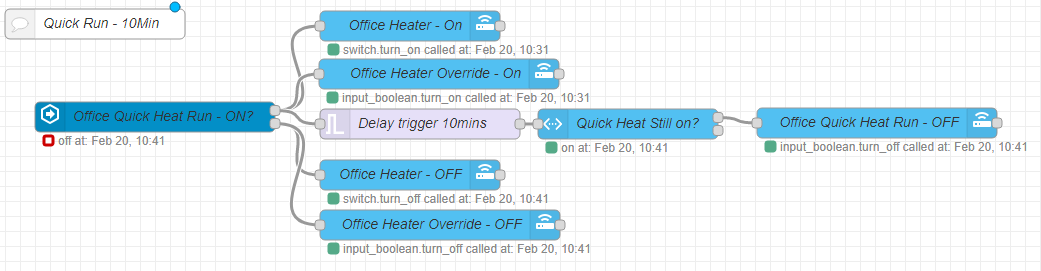 Figure1
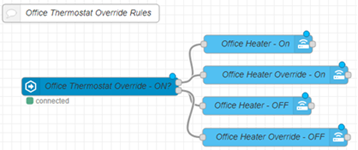 Figure2
Improvements
My quick list of enhancement ideas:
- Vacation mode - it rarely freezes in this part of California so completely turning heating off when on vacation would be ok
- Season deactivation switch - generally only need heating in this area late October - early May
- Desired temperature input - may be useful for guests…
- Graphing - vertical bar graph - daily count of heating minutes used
- Temperature failover prevention - only using 1 sensor as in an input, two more are available and could be incorporated